Overview
Geometry this year has been kind of insane. At the beginning of the year we had a teacher switch and so because of that for a while our class was behind the rest of the classes. We are now caught up and doing the same work as the other classes which for me is comforting. Also at the beginning of the year I unfortunately lost my composition note book which we put our foldables and cut outs into and so that put me in a stressed out state of falling behind for a bit. Now I am nearly caught up with the class on the comp book and the class is moving smoothly and we are learning a lot. Something I really enjoy about this class is that we are required to often do things that may seem repetitive but in the long run it really helps to learn the content better.
My favorite thing we have done this year was constructions. I really liked using the compasses in our work because the perfect arcs and circles that resulted were satisfying. I also have problems with measuring things accurately and so to completely forget the rulers and protractors and just trust in the compass to do the work was really nice freeing.
"The mathematician does not study pure mathematics because it is useful; he studies it because he delights in it and he delights in it because it is beautiful." ~J. H. Poincare (1854-1912.) When I read this quote, it made me smile. It made me smile because usually the only reason people I know--including myself, some days--is because they know that math is used in many jobs in the real world and they know that they need the tools so essentially, it is just useful. This quote makes me rethink the way I look at math and it caused me to see how special math is. Something that we have studied thus far in geometry that I felt was really beautiful was the triangle congruency short-cuts. I really liked this and thought it was beautiful because it made a lot of sense to me once we were taught it and because it came up so much there was plenty of time for me to explore it fully and by the end of that section I felt really satisfied with what I had learned.
Final Project Part 1: Pile of Pie Tessellation
- To start this adventurous project, I first needed to form my template. Because I was doing a rotational tessellation I had to create my template out of an equilateral triangle. Once I got my triangle perfect, then I drew on the edges of one side and cut it out. You take this piece that you cut out, and rotate it 60 degrees, keeping on corner in place line up the flat edge of the triangle with the flat edge of the piece you cut out. Then what I did for my template is divide the other side in half and draw a design on the bottom half and rotate it 180 degrees up to the flat edge of the remain triangle. I taped my pieces in place and then I had a fragile template I was able to work with.
- With my template I traced it a few times onto a blank piece of paper in different orientations and drew in the traced forms. This was I could figure out what I wanted my final tessellation to be. At the beginning of this process I was lacking creativity and just wanted to color my pieces random colors but then I was struck by genius. In our instructional video my partner and I decided make a video to find all the answers in school. At the end of our video we found a pie and that was the answer. So for my tessellation I decided to make it a slice of pie!
- The next step I took to create my tessellation was to trace them onto a large sheet of paper. Although this process sounds easy, it wasn’t. Originally I had thought that this part would be the easiest, second to coloring. I definitely underestimated how difficult this process would be. In fact, I had to make multiple templates because the first two that I created got out of line as I kept tracing and made the whole tessellation messy looking. Not to say that there aren’t mess ups in my final product, but much less than the other attempts.
- After tracing came the fun part; smooth riding from there. All that was left to do at that point was trace the lines in sharpie. This process was very simple and took me about 10 minutes. Then I had to finish drawing the actual image inside of each triangle. After I finished that, I colored my image and voila, tessellation done!
Final Project Part 2: Instructional Video
Along with the tessellation, we were assigned a partner and our task was to make an instructional video covering one topic that we learned about during the year. My partner, Avra Saslow and I made a video about the internal angles, arcs and chords of a circle. We covered a couple different rules for finding the degree of the angles and arcs. Additionally, we discussed several properties that always apply to any circle that you many encounter. We completed an instructional video that you can watch below!
Discovering and Proving Polygon Properties
In geometry we have also been learning about properties of polygons and triangles. These tools that we have been learning dealing with polygons is really helpful to find certain unknown variables on tests or quizzes. Well first of all you need to know what a polygon is. For the longest time I thought that it was some big scary math term, but the I realized that it was just shapes. A polygon is a closed plane figure made up of several line segments that are joined together. The sides do not cross each other and exactly two sides meet at every vertex. There are two ways to categorize polygons. Equiangular and equilateral. Then there are concave and convex polygons. Convex polygons are the polygons we normally see, with each interior angle less than 180 degrees. A concave polygon had diagonals on the outside and there is at least one angle that measures to 180 degrees or more. In this section we focused on mainly regular (equilateral and equiangular) and concave polygons.
One thing that we started out with was writing equation to find the angle measure of a polygon with a certain amount of sides, or the amount of sides if we know one angle. To find the sum of all the angles equals 180(n-2). The equation to find just one angle of the polygon is the same but divided by n: 180(n-2)/n. Because these equations are used to find the measure of the angle with the sides given (n) then to find the sides if you have the angle you would put the angle measure on one side of the equation and then use algebra to solve for it. Another polygon property we discovered were the quadrilateral family, which encompasses the parallelograms. Something interesting we learned about parallelograms is that a rectangle mixed with a rhombus is a square. Another important thing to remember is that all the angles of one set of exterior angles of any shape will add up to 360 degrees.
One thing that we started out with was writing equation to find the angle measure of a polygon with a certain amount of sides, or the amount of sides if we know one angle. To find the sum of all the angles equals 180(n-2). The equation to find just one angle of the polygon is the same but divided by n: 180(n-2)/n. Because these equations are used to find the measure of the angle with the sides given (n) then to find the sides if you have the angle you would put the angle measure on one side of the equation and then use algebra to solve for it. Another polygon property we discovered were the quadrilateral family, which encompasses the parallelograms. Something interesting we learned about parallelograms is that a rectangle mixed with a rhombus is a square. Another important thing to remember is that all the angles of one set of exterior angles of any shape will add up to 360 degrees.
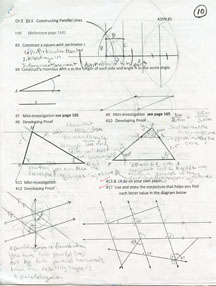
Constructions
When doing constructions in geometry, you are only permitted to use a compass and a ruler. When we first started this I had a hard time trying to make angles without a protractor and I didn't really believe the claim that using only a compass and ruler would be easier. Then we began with a large packet with instructions on how to make specific constructions like constructing am angle bisector, a midpoint, and perpendicular bisectors I realized how easy it really was.
To do anything you must start with a working line or a working angle. Then you need your compass set at a radius larger than the midpoint (approximate). Then you create arcs where they are necessary and draw a line through the arcs intersection points. Along with making congruent segments and angles and segments, perpindicular bisectors and segments, angle bisectors and parallel lines, we also used our construction tools and compass to create points on concurrency in triangles. In a triangle there are four points of concurrency; the incenter, the circumcenter, the orthocenter and the centroid. = The incenter of a triangle is found by constructing the angle bisectors of each angle and the point of concurrency is the incenter. = The circumcenter in a triangle is formed by creating the perpindicular bisectors (lines that make 90 degree angles with the opposite side and bisect the same segment instead of connecting to the angle) and where the perpincicular bisectors conjoin is where the circumcenter is. = The orthocenter of the triangle is formed when you construct the altitudes (different from perpindicular bisectors in the way that the altitude connects to the vertex of the opposite angle as well as making a 90 degree angle with the side it connects to) of each segment and where those lines intersect is the orthocenter. = The centroid is formed when the medians of a triangle intersect. |
|
|
|
Angle Relationships
When we were studying angle relationships it shocked me how many relationships angles can share.
There are vertical angles where you have two lines intersecting and the angles opposite each other are congruent. Also there are complementary angles and supplementary angles. Supplementary angles are angles that add up to 180 degrees. Complementary angles add up to 90 degrees. When we were studying parallel lines and transversals we discovered more angle relationships. There are Alternate Interior Angles which are angles on opposite sides of the transversal and in between the pair of parallel lines. Then there are Corresponding Angles which would be an angles on the same side of the transversal with one interior and one exterior. Alternate Exterior Angles are similar to Alternate Interior Angles because they are on opposite sides of the transversal but they are on the outside of the parallel lines rather than in inside. |
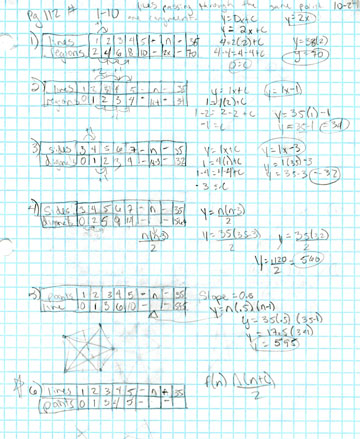
Patterns and Equations
In geometry we observed different equations that matched up with patterns and vice versa. Along with learning how to find and write equations for linear patterns we also learned how to find equations for exponential patterns as well.
When finding and observing linear patterns we used the equation: y=mx+b or the way I learned it: y=a+bx. For exponential patterns there were a few equations we learned and sometimes it required you to form a mixture of two equations because often times there were multiple values we were asked to solve for. |
|
Reasoning
In geometry so far we have learned about inductive and deductive reasoning and how to apply that problems that are presented to us to solve.
Deductive reasoning is when the conjectures are given to you and you prove that the conjecture given is true using other conjectures and possibly equations.
Inductive reasoning is when you are given the information to create a conjecture and you have to solve the problem as well as forming your own conjecture.
Animas High School 3206 North Main Avenue Durango, CO 81301 (970) 247-2474
My Contact Information: [email protected]
Updated on: 12.14.11
My Contact Information: [email protected]
Updated on: 12.14.11
