Physics Overview
Physics is my first period class and it always gets me in a good mood to start the rest of the day. In physics we often do labs out of the QSL Physics Lab Manual and recently we finished a large one and a half week project on building bottle rockets. At the beginning of the year we were allowed to create our own experiment and with a partner follow the scientific method to great a legitimate experiment. After that we have done other labs such as Calculating G with spark timers, finding the elasticity of different balls through the Bounce Lab, discovering the rate of acceleration in the class room and comparing that with what it should be--9.81 m/s--with the Whirly Bird Lab and also completing the Cat Can Challenge which combined skills from smaller labs of the past and put it all together in one larger project. a project which actually got our teacher, Dave Heerschap, his job at Animas.
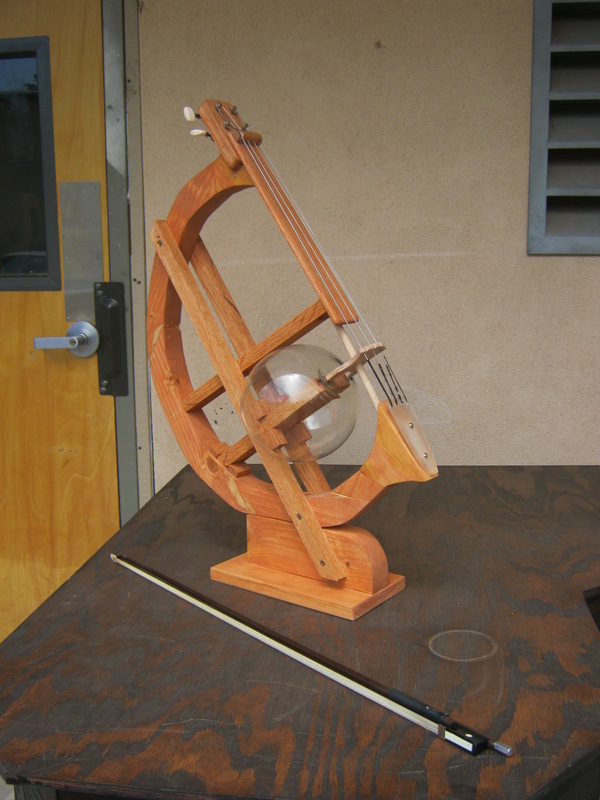
Although our final product definitely exceeded my imagination, there was quite a process that we went through to get to that point. At the beginning of this music project my partner and I had originally decided to build a music box. It was going to be a metal one with little prongs that you turned the crank of to create sound. After thinking over this and realizing that it probably wasn’t the easiest project, we decided to change our idea. We then chose the Uncello which turned out to be much more difficult than the picture led us to believe. In the packet we were given at the very start of this project there was an area for us to outline what we were going to do on each specific day. As soon as we started actually building I could tell that we were in for a lot more than we had originally thought.
I’m going to tell you how it started. It began with a picture. A simple picture found on the internet that lit a fire under my partner and I, making us think that this would be an easy instrument. After setting our hearts on the Uncello, we had to consult our teacher to gain some insight as to how approach the instrument. The first thing he told us was that using the picture we could scale up to the diameter of the fish bowl we were planning on using. After all, the fish bowl was the only thing we couldn’t change. Luckily for my partner and me, my math class was actually in the middle of a unit on proportions and scaling things up or down using one ratio. Although this was a refresher from 7th grade, it was a refresher much needed and in the end definitely benefited our project.
So after tedious measuring and frantic calculator usage, we had our measurements for the actual Uncello we wanted to make. Because we bought a baby fish bowl, we created a baby Uncello.
Throughout this project I was really shocked at how much more complicated it turned out being. Due to lack of proper knowledge of the tools we needed to use as well as inability to learn because of safety hazards, my partner and I often found ourselves wondering what to do until our teacher could make a cut for us or help us problem solve. This pattern quickly put us behind, and the stress began to eat us alive. Then the due date rolled along and my partner and I were not even close to being finished with the project and we knew our weekend would be consumed by the project and getting it done.
I am deeply indebted to my partner and her father as they worked the entire weekend on our project. I joined them on Sunday to finish up the instrument and stain it to make it look classy. Overall our build surely did not go to plan and we ended up working major over time on the weekend.
I feel like if I had this project to do over, I would definitely evaluate the tools we would need and if our teacher had them. Many times during this project I wished I could use the table saw because that would have made a few of our processes easier for sure. Also, if I had this project to do over, I would have made sure we worked on it the first weekend we were allowed to take our instrument home so that we wouldn’t have so much the second weekend.
Going into this project I had thought that the only way an instrument makes sound was through the strings and the empty space of the instrument. After this project I have learned that the sound waves really travel through the whole frame of the instrument and the type of wood that is used for the body of an instrument is not just for looks; it enhances the entire sound the instrument produces. One way this concept is exhibited in our project is by strumming the strings and keeping your ear close to the top of the frame. Surprisingly this is where the instrument sounds the best.
Rube Reflection
The weekend before the exhibition my partner and I had spent our whole weekend in her dad’s garage working on getting the little parts to function properly. One part of the Rube that I was really nervous about was the dominoes. The majority of the time the dominoes were triggered and then they fell where they were supposed to, but there were a few times during our practice runs where the dominoes needed a little coaxing and help to actually fall over. On top of that, the safety hazard of the match was definitely a concern. Although we got the match to light almost every time, when the marble hit the mouse trap to trigger the match, the marble would fly. I was worried this would hit someone in the eye. Over all I feel like the whole building process went fairly smooth. Unlike in other projects, we remembered to take it home two weekends in a row so that we weren’t up all night the last weekend possible. The structure of the machine was done the first weekend and so that next week we could work on the individual steps. Then the second weekend we cleaned up our Rube and got the key parts, the match and the egg, to function correctly. Cracking the egg. This step was the hardest step of the whole project. Originally we had thought of a weight sliding down and hitting the egg and cracking it, but then we came to the issue of the shells. Then we were going to have the egg on the top of a jar and a knife would swing down and hit the top of the egg, making it fly and then stop against a barrier and slide into the pan. With this method we still were faced with the difficulty of the shells. At last, we came to the conclusion of having a board with two screws in it. The egg would have string taped on to each end and the string would tie onto the screws. Then we had a knife swing down, hit the board, and crack the egg which would slide into the pan, located directly under the wooden board. Because we had the egg taped, the shells stayed on the board instead of sliding into the pan. I have my dear friend Emily Wieser to thank for such a genius idea. I also must thank her father, Ross Wieser for helping us with the power tools and logistics of the Rube.
CAT CAN LAB
Write-Up
Speaking theoretically, if my little brother was going to ride of a cliff on a Razor scooter, which he never would for that is a ridiculously dangerous proposition, I would tell him he needs to find the velocity at which he travels and the hang time to determine how far to put out his kiddy pool which he would have to land in to survive. A few key measurements he would need in order to start would be the height of the cliff and the distance he would be traveling. So measuring from the bottom of his ramp to the end of the cliff would give him an accurate measure of his track distance. Then, to get an average of the time that it take for him to reach the edge of the cliff, he would need to measure the time 5 times and find the average of those times. Using the length of his track and the average time, he then would be able to find his velocity by dividing the track length by the average time. An important part of this experiment would be finding the hang time to determine how long he is in the air which will affect the distance the kiddy pool needs to be from the cliff edge. To find the hang time he would use the equation time=square root of: distance divided by 0.5 multiplied by the acceleration. So for the distance he would enter the height of the cliff and he would use the acceleration of 9.81 meters/second. Once he has found his hang time, he will calculate the distance the pool needs to be from the base of the cliff. To find this one last number, multiply the hang time by the velocity and the number that results will be the distance to place the pool to insure he lands in it. This of course is what I would tell my brother if he were ever to do such a dangerous thing.
|
Procedure
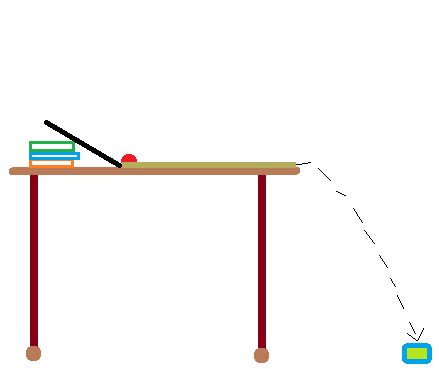 Image of a the track built for our marble done in the Paint program.
The Cat Can Challenge was basically a lab where we rolled a marble
off of a table and had to get it to hit the cat can at the bottom, which
was our little town of evils. Now, this may sounds easy, but trust me
it isn't. We weren't allowed to let the marble fall all the way until we
had calculated the length of the track, the speed that it rolled down
the track at, and with those two numbers we were then able to find the
velocity. We used the hang time to determine how long the marble would
be in the air as well as the height of the table which we applied to
figure out how far away from the bottom of the table the can needed to
be placed. We propped our ramp up on a stack of books, and made sure our
marble stayed in the same track by using meter stick on the side of
where we wanted the marble to run.
|
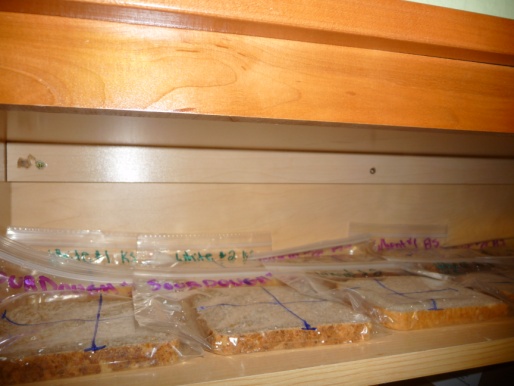
Moldy Bread
Sad moldy bread image that we did not take.
Problem:
In seven days, how long will it take for three different types of bread, (White, Wheat, and Rye), to mold, and does the speed of the mold become increased if the bread is organic or non-organic?
Hypothesis:
If three different types Non-Organic and Organic breads are left out; Wheat, White, and Rye, then the Organic White Bread will mold the fastest because there is less preservatives in organic bread, and less density in White bread.
Research:
While researching about moldy bread, and experiments that have been run before, we discovered some information that could be of help to us, and understanding mold better. Molds obtain their food from extracellular digestion, and are made up of mostly water. Because molds cannot control their temperatures, they must grow, and develop based on whatever their environments temperature is. Mold grows faster on food in the summer when the temperature is warmer, rather than in the winter when’s colder and drier.
Materials List:
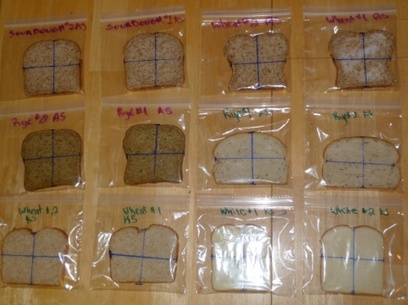
3 loaves of non-organic (white, wheat, and rye breads), 3 loaves of organic (white, wheat, and rye breads), 12 sandwich sized plastic Ziploc baggies, a roll of Paper Towels, Sharpies, Scissors, Blow Dryer, and a Ruler.
Procedure:
1) Check to make sure you have all of your materials before you start the proce
2) Take your twelve Ziploc Sealable Bags and insert 2 samples of each type of non-organic and organic bread slice into a separate bag each. While selecting your slice of bread, make sure you select your slices from the middle of the loaves, where the slices will be the most even. Be careful not to put any pressure, or create any damage while inserting the bread slices into the bags.
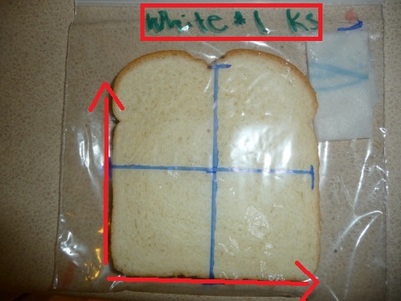
3) Using a sharpie marker, carefully, without damaging or putting any pressure on the bread, create a grid on each of your bags based on the width and the height of your pieces of bread. Then label the bag to which type of bread is in it.
In seven days, how long will it take for three different types of bread, (White, Wheat, and Rye), to mold, and does the speed of the mold become increased if the bread is organic or non-organic?
Hypothesis:
If three different types Non-Organic and Organic breads are left out; Wheat, White, and Rye, then the Organic White Bread will mold the fastest because there is less preservatives in organic bread, and less density in White bread.
Research:
While researching about moldy bread, and experiments that have been run before, we discovered some information that could be of help to us, and understanding mold better. Molds obtain their food from extracellular digestion, and are made up of mostly water. Because molds cannot control their temperatures, they must grow, and develop based on whatever their environments temperature is. Mold grows faster on food in the summer when the temperature is warmer, rather than in the winter when’s colder and drier.
Materials List:
3 loaves of non-organic (white, wheat, and rye breads), 3 loaves of organic (white, wheat, and rye breads), 12 sandwich sized plastic Ziploc baggies, a roll of Paper Towels, Sharpies, Scissors, Blow Dryer, and a Ruler.
Procedure:
1) Check to make sure you have all of your materials before you start the proce
2) Take your twelve Ziploc Sealable Bags and insert 2 samples of each type of non-organic and organic bread slice into a separate bag each. While selecting your slice of bread, make sure you select your slices from the middle of the loaves, where the slices will be the most even. Be careful not to put any pressure, or create any damage while inserting the bread slices into the bags.
3) Using a sharpie marker, carefully, without damaging or putting any pressure on the bread, create a grid on each of your bags based on the width and the height of your pieces of bread. Then label the bag to which type of bread is in it.
|
|
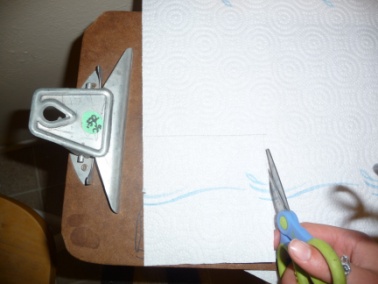
4) Then using the roll of paper towels, cut out 4 “in by
4”in squares and fold them neatly into a square that is 1”in by 1”in.
You should come out with one paper towel square per bag.
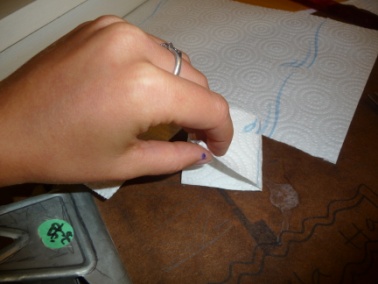
5) Place the paper towel square, each by each, under the sink
for 2 seconds then squeeze excess water out using the palms of your
hands. Place the squares, one by one, into the bags with the slices of
bread, making sure it doesn’t touch the slice itself. You can skip this
step if you’re deadline for your experiment is longer than two weeks,
if not, proceed with the paper towels to jump start the project.
Seal your bag shut, making sure there is no air left in bag as you seal it.
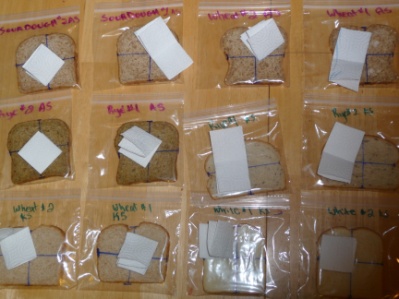
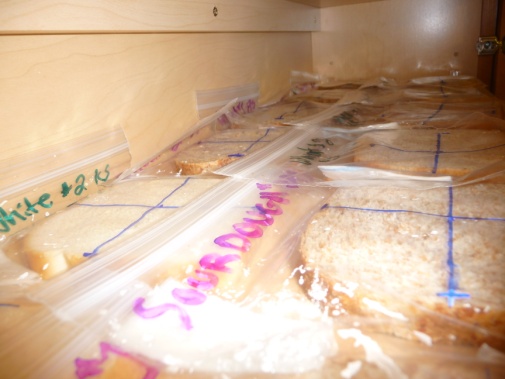
6) Place your slices of bread carefully within a dark cupboard. Line them up so you can see the labels. Make sure your slices are not on top of each other or over lapping.
7) Check on your slices of bread everyday for however long you are doing the experiment. If your experiment is due in a week or less, blow dry on hot with a hair dryer for a controlled 5 seconds. This will create more mold faster, so you can get better results!!! Good luck and enjoy the mold!
Seal your bag shut, making sure there is no air left in bag as you seal it.
6) Place your slices of bread carefully within a dark cupboard. Line them up so you can see the labels. Make sure your slices are not on top of each other or over lapping.
7) Check on your slices of bread everyday for however long you are doing the experiment. If your experiment is due in a week or less, blow dry on hot with a hair dryer for a controlled 5 seconds. This will create more mold faster, so you can get better results!!! Good luck and enjoy the mold!
|
|
Conclusion:
The experiment was to test what bread molded fastest out of non-organic and organic with the flavors white, wheat and rye from each.
For our experiment we placed twelve pieces of bread into sandwich sized plastic Ziploc baggies; two pieces of each flavor from the organic and non-organic loafs. Then we drew a grid of 4 approximately equal parts on the bags with a sharpie, and labeled the bags, stating the slice number (1 or 2), the brand (organic or non-organic) and the flavor (white, wheat or rye.) In addition to the slices of bread in the bags, we added 4 in x 4 in damp paper towels folded down into 1 in x 1 in squares to enhance the molding. Every night we measured the amount of mold growing on each slice. Then, on the fourth day of measuring growth, we blow dried the bread, shooting hot air into the bags of 5 seconds to jumpstart the molds growth.
The results for our experiment showed that our original hypothesis; “If we leave out three non-organic and organic breads; Wheat, White, and Rye, then the organic bread will mold faster because there is less preservatives in organic bread, and less density in White bread,” was incorrect because the white organic bread had only one colony of mold at the end of seven days. Rather than the white, organic molding fastest, the rye, non-organic had collected the most mold at the end of our experiment. Although the wheat organic, the white organic, and the white non-organic also had small amounts of mold growth, the rye non-organic far surpassed any other slice in mold growth.
One place in the experiment where there could have been error was in the actual measuring. Because we didn’t measure the area of each slice before the mold grew, we had 3 different ways of measuring the mold—colonies, square inches, and percentage—so our results cannot be compared very easily. Also the curves of the bread probably played a part in the inaccurate measuring of mold. A way that we could have improved the experiment would be to measure each slices area exactly before we inserted them into their bags, or we could have even cut the bread into squares that were equal sizes to eliminate the variable of the curves of the slices.
If we were to test the bread again using the same procedure—but correction to our measurements—my new hypothesis would be; If we leave out two different brands, organic and non-organic, with three different flavors for each, white wheat and rye; the non-organic rye will mold the fastest because it is the least dense and is non-organic. The non-organic breads will gain the most mold growth because they are softer and moister to spur the mold. The rye bread is least dense and therefore has more space in it for mold to accumulate.
***To see my partner, Emily Wieser's conclusion visit Emily's Digital Portfolio.***
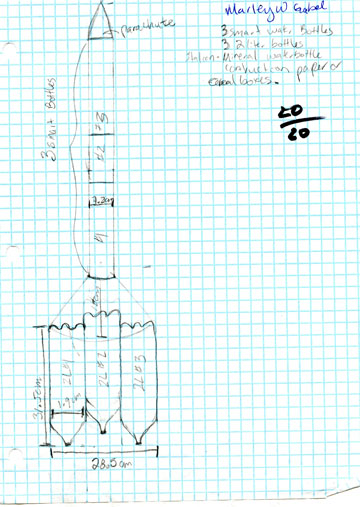
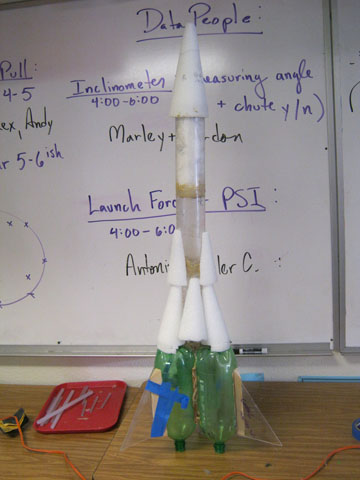
My drawing of our rocket.

Gordon's first, highly ambitious drawing.
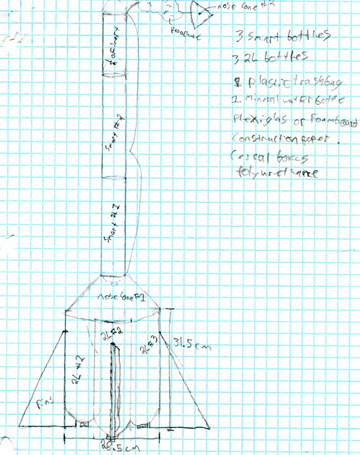
Gordon's second drawing.
|
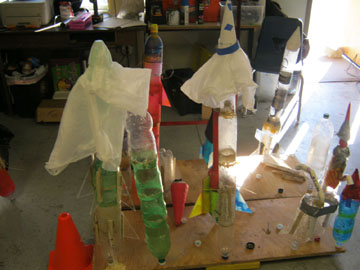
Bottle Rockets
Rocket reflection:
My partner, Gordon Gianinny, and I probably had the most ambitious rocket design. Our design was to have three 2 liter bottles on the bottom and then connect three Smart Water bottles together as the tip part. Our design was probably not the most fail proof design because in the history of the project no three nozzle rocket had ever actually succeeded. Well, like the others our rocket was not as successful as we had wanted it to be. When we watched the slow motion video footage of our rocket taking off, it actually shows our rocket doing a front flip because we didn’t pull the triggers at the same time and so the release was off and hence, the rocket tilted. Although we didn’t have a successful launch on the night of the exhibition, I feel that if we worked on our timing we might have our rocket actually launch. One thing I would have changed about our rocket would to space our bottles on the bottom right the first time we did it. We had our bottles lined up and epoxied them together twice because they didn’t fit the nozzles. If we had epoxied on the launch pad, then we wouldn’t have used up so much time taking them apart and redoing our gluing process. Also, there was a pressure leak from one of the bottles when we were pumping the bottles up with pressure and I believe there was a leak because we sanded one of our nozzles down too much. We could have prevented this by measuring how much needed to be taken off and marking that rather than going power-sander happy. My partner and I really worked hard on getting the bottles to fit and getting the loading to be quicker but we took too much off of one of the bottles. In fact one day at lunch my partner and I came in for lunch and spent our whole lunch period using the power sander to get our bottles nozzles to fit the launch pad. On top of fixing the way our bottles fitted, I would have tried to make larger pressure chambers. Although our idea was smart because we didn’t have any pressure seams on the chamber it also deterred our rocket because it couldn’t have as much pressure or water to increase our thrust. If I was to do this project again I probably would have made a larger pressure chamber and dropped the idea of a three stage rocket. A lot of groups had issues with their parachute deploying, but for our rocket that wasn’t an issue. Although it only went about 4’ in the air our rocket had enough thrust and it was moving fast enough that the nosecone caught the wind and popped off. Our nosecone really popped off a bit too soon because as we pulled the pins, the nose cone tilted and that may have contributed into the reason that our rocket went sideways.
|
Animas High School 3206 North Main Avenue Durango, CO 81301 (970) 247-2474
My Contact Information: [email protected]
Banner Image: Lambert. Physics Image. (2008). Website: Gemzies.com. 11/4/11
Updated on: 11.14.11
My Contact Information: [email protected]
Banner Image: Lambert. Physics Image. (2008). Website: Gemzies.com. 11/4/11
Updated on: 11.14.11
